The first thing to do before connecting the meter is to study its passport, in particular, the manufacturer's requirements for the installation site, mounting method and operating conditions of the electric meter (for example, induction meters are designed for operation at temperatures from -10 to + 40 °С and therefore cannot be installed in unheated premises without equipping them with a heating device in winter, while electronic meters, as a rule, have a larger operating temperature range and can be installed in unheated premises without installing devices for their heating).
In addition, it is necessary to take into account the requirements of the current regulatory documents regulating the requirements for connecting electricity meters:
- For each house / apartment, only one single-phase or three-phase electric meter (clause 7.1.59. PUE) should be installed, with the exception of cases of connecting electrical installations of different tariff groups (for example, installation of high-power electric heating installations)
- For the safe replacement of a meter directly connected to the network, a switching device must be provided in front of each meter to relieve voltage from all phases connected to the meter. At the same time, disconnecting devices for removing voltage from settlement meters located in apartments should be located outside the apartment. (clause 7.1.64. PUE)
- After the meter connected directly to the network, a protection device must be installed. If several lines equipped with protection devices leave after the meter, the installation of a common protection device is not required. (clause 7.1.65. PUE)
Wiring diagram for a single-phase meter
Single-phase meters are the most common electrical energy metering devices, they are used for electricity metering at loads, as a rule, up to 12 kW (up to 60 Amperes) in residential buildings / apartments, small businesses (shopping pavilions, stalls), etc.
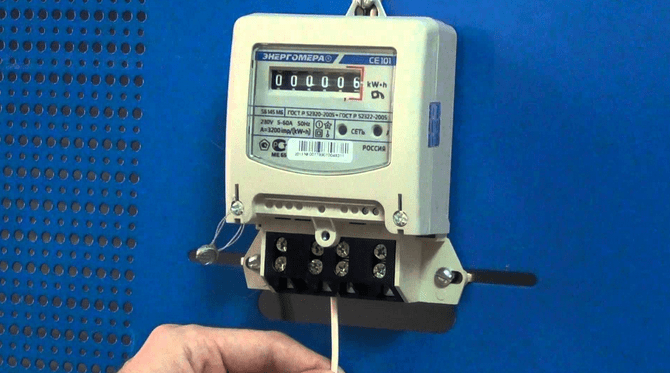
Connecting a single-phase meter does not require deep knowledge in electrics, as it has the simplest connection diagram. All single-phase meters, both electronic and induction, have only four outputs for connection:
Contact 1- for connecting a phase supply wire; Contact 2- for connecting phase wires outgoing to electrical receivers; Contact 3- to connect the neutral supply wire; Pin 4- to connect the zero, outgoing to the electrical receivers, wires. Thus, to the conclusions of the counter 1 and 3 the input power cable is connected, and to the outputs 2 and 4 load is connected. That is, the connection of wires to the meter is as follows:
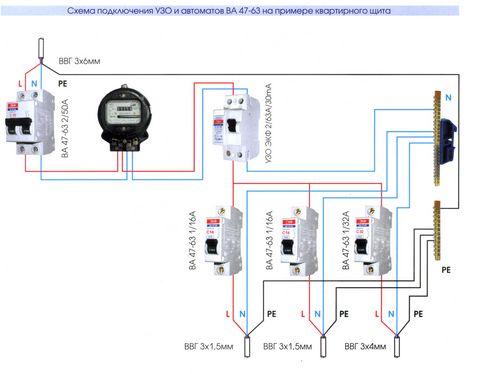
Taking into account all the above requirements, the connection diagram of a single-phase electricity meter should have the following form (since the connection diagram of an induction electric meter is identical to the electronic one, we will give one general circuit with an electronic meter):
Contact 1- phase 1 input from the input; Contact 2- output of phase 1 to the load; Contact 3- phase 2 input from input; Pin 4- output of phase 2 to the load; Contact 5- phase 3 input from the input; Contact 6- output of phase 3 to the load; Contact 7- zero input from input; Contact 8- zero output to the load.
Thus, the connection of wires to a three-phase meter will look like this:
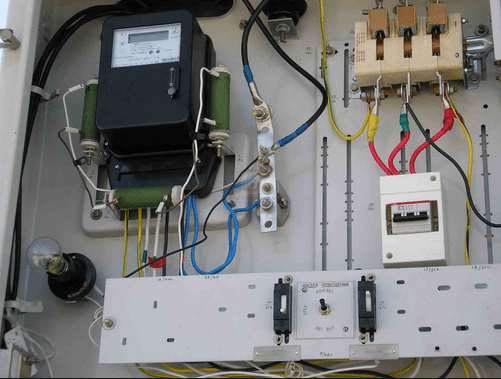
However, it should be noted here that the connection of the old meter has some features, namely, three-phase five-ampere induction meters that were previously used as direct-on meters do not have 8 leads for connection, but 11 for the possibility of connecting them through instrument transformers:
Direct connection of such a meter to the circuit is as follows:
Contact 1- phase 1 input from the input; Contact 2- jumper from pin 1; Contact 3- output of phase 1 to the load; Pin 4- phase 2 input from input; Contact 5- jumper from pin 4; Contact 6- output of phase 2 to the load; Contact 7- phase 3 input from the input; Contact 8- jumper from pin 7; Contact 9- output of phase 3 to the load; Contact 10- zero input from input; Contact 11- zero output to the load.
Since such counters are still found, we will also give their connection diagram:

Many people think that connecting an electric meter ,
a very difficult and not an easy task, which only a competent, qualified electrician can do. In fact, everything is ridiculous
easy and simple, especially if you have a detailed electric meter connection diagram, with step by step photos and professional commentary. In this article, just such an instruction is set out, which describes in detail electric meter connection diagram. Taking advantage of her ,
self-connection will not pose any difficulties for you.
There are counters of various designs:
- mechanical and electronic
- one tariff and two tariff
- direct connection and secondary (the secondary meter is connected mainly in power cabinets and switchboards, for example, at the input to a multi-storey building, at substations, where very large currents flow, it is connected to the circuit through current transformers), only direct connection meters are used in everyday life
In this article, we will consider the connection of a single-phase direct connection electric energy meter. It should be noted that the connection diagrams for mechanical and electronic electricity meters are the same.
In our example, an electronic counter is used, with a mechanical readout mechanism.
Preparatory work
Before connecting the electricity meter, it is necessary to carry out preparatory work. Install a box in which all equipment will be mounted.
Most modern meters are modular. This means that their installation is carried out on a special mounting rail, which greatly facilitates and simplifies the installation process. Also, household series of protective equipment are also modular, these include:
- circuit breakers
- RCD (residual current devices)
- differential automata
- various adapter terminals and zero busbars
- voltage limiters
- voltage indicators
They are installed in special boxes made of special non-combustible plastic. These boxes can be mounted and built-in, have different sizes, which depend on the number of installation places inside the shield.
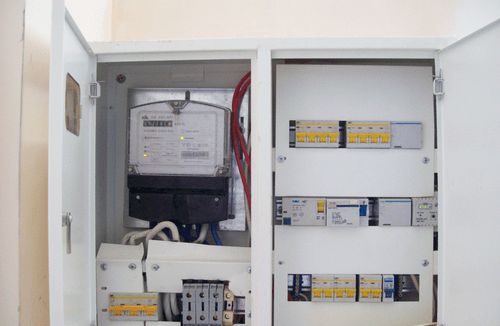
The box used in the example, of hinged execution, is designed for 24 installation positions, has two din rails of 12 places. DIN rail - a metal plate on which modular equipment is mounted.

Boxing consists of two main parts:
- outer - protective cover with a door
- internal, - the package of which includes one or more din rails, their number depends on how many installation positions the box is designed for. And a zero bus designed to distribute the supply zero between all outgoing wires.
Let's move on to preparing the box for installation. Remove the top cover. To do this, unscrew the 4 screws securing the outer cover.

Before us, the inside of the box. As you can see, it has two din rails mentioned above.

And zero tires.

We mount the box on the wall. It is worth noting that according to the requirements of the PUE (rules for electrical installations), the installation height of the meter indoors must correspond to certain dimensions, 0.8-1.7 meters from the floor. Such requirements are due to the fact that the controller or sealer serving the electrical organization would be able to take meter readings without the use of stools and stepladders. The optimal installation height is the height of the eye level of an average person, 1.6-1.7 meters.
AT depending on the material of the wall,we use the necessary fasteners, dowels for concrete or self-tapping screws for wood.

And so, the box is installed. We proceed to the installation of modular equipment.
Installation of an electric meter and modular equipment
According to the PUE, a protective shutdown device must be installed in front of the meter (electricity meter). As a rule, in most cases, such a device is a two-pole circuit breaker. In the connection diagram of the meter, it performs the following functions:
1. Electricity meter protection
- against short circuit
- from fire, as a result of exceeding the permissible load for which the meter is designed,
- the ability to perform work on the replacement, maintenance of the meter
2. Limitation of permitted power (adjusted by the rating of the circuit breaker)
If necessary, you can read more about .
In our example, the input protective device will be installed directly in the apartment shield, box. Also, in some cases, it can be installed in the floor shield, on the landing. Here, the main criterion is the method and the possibility of filling.
Everything that is in the box is subject to sealing. If the service organization has the opportunity to seal the circuit breaker, then it is mounted in a box, if not, then in a floor board. The machine is sealed with special stickers that are glued to the contact screws, above and below the circuit breaker.The counter is sealed with plastic or lead seals.
Well, we figured out the sealing, let's get back to installing the electric meter.
Let's start with the installation of an introductory two-pole circuit breaker. Using a special latch on the back of the machine, we install it on the top DIN rail.
The main measuring device for electricity consumption in an apartment is an electric meter. As a rule, the installation of this type of metering devices is carried out by masters of a narrow profile (electricians) with experience, knowledge and relevant qualifications. However, if there is a desire, this event can be held independently. The main thing is to first familiarize yourself with the rules for installing an electric meter and prepare the necessary materials.
Important ! Strict adherence to the instructions when connecting meters for electricity metering allows you to eliminate any negative consequences during its operation. You need to understand that when installing an electric meter with your own hands, all responsibility for accounting errors lies with the owner of the apartment.
Types of counters
According to the type of mechanism, electricity meters are electronic and induction.
To date, induction-type electricity meters are gradually leaving the market. By order of the government, it is forbidden to use this type of meter, since it is believed that such a meter is very easy to “wind up”.
Counters with an electronic mechanism are distinguished by the highest accuracy, compact size and versatility of use. It is also worth noting that it is the electronic electricity meter that can be operated in a multi-tariff mode. This property will be appreciated by consumers of those regions where electricity tariffs vary depending on the time of day.
When choosing between induction and electronic electricity meters, an electronic type meter has an undoubted advantage.
In order to determine the value of the rated current, it is worth dividing the active power indicator provided by the energy company per consumer by the voltage indicator in the general network.
Three-phase connection is characterized by higher power. But for a domestic consumer, it is preferable to use a network for one phase.
Difficulties with the installation of an electricity meter may arise in a situation in which the owner of the apartment needs to power the area with a rated current of more than 100A. Under such conditions, direct connection of the electric meter is simply impossible. The use of any additional elements leads to the fact that the value of the error in accounting for electricity consumption increases.
When choosing a metering device, special attention should be paid to the date of installation of the seal and its integrity.
Attention ! The seal of the electric meter for a network in one phase must be no older than one year. If the meter for a three-phase network is verified, the seal is valid for two years.
Is self-installation of an electric meter legal?
You can handle the installation of an electricity meter without any problems on your own. But before you get down to business, you must definitely obtain permission from the relevant services. To this end, contact your local network provider office and request that you be given a statement of work to carry out the work. In the same organization you will be able to conclude the necessary contracts.
According to the current regulations, the owner of the house can install electricity meters within the capacity of his consumer networks. The best location for the electric meter will be a heated distribution meter in the apartment. But in recent years, a requirement has been made that the electric meter be installed only outside the apartment, and representatives of the inspection organizations have free access to them.
Also, a representative of the local power company may require that the electricity meter be mounted on the outside wall of the building. Each of the proposed options can always be discussed individually. For apartment owners, there are requirements for placing an electric meter in the general electric meter on the floor area.
The official version of energy companies, according to which they force homeowners to install electricity meters on street poles, is to ensure unhindered access of company employees to the electricity meter in order to take readings and carry out routine repairs.
According to the unspoken version, forcing the installation of electricity meters outside the dwelling, energy suppliers are trying by all means to prevent hacking attempts.

Electric meter connection diagrams
For an ordinary person, far from installing an electrical network, it is not at all necessary to know the complex schemes for connecting an electric meter. It is quite enough to understand how you can easily and quickly connect an electric meter.
The simplest and most popular installation method is to connect an electric meter in a single-phase circuit. You need six wires to work. Phase, ground and zero cables are connected to the meter input. Similar actions are carried out at the output of the counter.
In order for the operation of the electric meter to be simple and convenient, and most importantly safe, it is recommended to install a circuit breaker in front of the meter. This device will help prevent a fire in time by turning off the power, for example, if an emergency occurs.
It is worth noting that employees of electricity supplier companies do not support the installation of switches. To avoid unnecessary proceedings and problems, the switch must be sealed. This will require: a plastic box, seals and DIN rails. All these devices are not very expensive, and in order to mount them, it will take no more than five minutes. All this is worth doing everything right, while avoiding misunderstandings and troubles with regulatory authorities.
The general design of the electric meter provides for a special terminal block. This element is presented in the form of a copper bar, which is fixed with special dielectric clamps. It has several holes through which the cables are connected using clamping screws. This connection option is recommended in cases where there is a need to combine all cables into one whole element.

Rules for installing the meter
When installing an electricity meter, it is very important to comply with a number of specific requirements and rules. First of all, they relate to safe operation techniques, which is always relevant for electrical appliances.
It is not recommended to install metering devices if the ambient air temperature is below 0C. Electronic boards do not tolerate low temperatures and failures may occur in the overall system. For a larger number of modern metering devices, low air temperature during installation is unacceptable. The best option is the air temperature in the place where the meter is mounted, about + 5C.
Important ! If the electricity meter is installed outside the dwelling, then it is necessary to provide for the presence of a special metal, hermetically sealed cabinet.
The height to which the electric meter is attached is about 90-160 cm. If you mount the meter on the wall above or below the specified parameters, then the procedure for taking readings can become very problematic.

The main stages of connecting the electric meter
Do-it-yourself installation of an electric meter takes place in several stages:
- Select the necessary tools and materials. You will need:
- electricity meter;
- protective shield;
- insulating elements;
- fasteners;
- DIN rails;
- voltage sensor;
- automatic switches.
- Be sure to specify how many phases the power grid has in your home. Based on this, calculate the required number of circuit breakers.
- Install the electricity meter in the shield. For its installation, you can use special fasteners.
- Mount protective shutdown sensors (plugs). They are attached to a DIN rail, which is pre-installed on the post insulators. The machines are fixed on the rail with special spring-loaded latches.
- Mount the protective and earth bus in a common shield. Busbars must be placed at a sufficient distance to avoid cable short circuits.
- Connect everything to the load. The phase is connected to the lower terminals, the neutral to the neutral bus, the ground is connected to the corresponding ground bus.
- Connect the upper clamps of the machines with jumpers. This item can be purchased in specialized stores.
- Connect the electricity meter to the load. To do this, connect the phase output to the upper terminals of the automata, the zero output to the zero bus.
- Mount the electrical box on the wall. The height should be such that the operation of the electric meter is comfortable and unhindered.
- Identify neutral, phase and ground cables. To do this, use a special indicator.
- Turn off the electrical power in the house.
- Connect the phase cable to the first terminal of the electricity meter. Zero must be connected to the third terminal.

Self-installation of an electricity meter is carried out at any convenient place, but in strict accordance with the PUE regulations - the main document that determines the rules for installing metering devices.
Connecting the electricity meter with your own hands should be done in accordance with the following recommendations.
To date, the market has been overwhelmed with electric meters of various types, differing in technical indicators and design characteristics, so it is very important to choose the right high-quality and durable meter.
Main selection criteria:
- Principle of operation and type of device, according to which the counter can be induction or electronic. The first option is represented by simple electromechanical devices with a rotating metal disk. The advantages are the cost and indicators of calibration intervals. The second option is represented by devices with input signal conversion and high accuracy.
- Number of phases allows you to classify metering devices into single-phase and three-phase meters. In the first case, only single-phase electrical networks are supposed to be used. However, three single-phase electricity meters can be connected to a three-phase network, which makes it possible to account for the energy consumed separately for all phases.
- Accuracy class determines the measurement error indicators, which can vary from 0.2% to 2.5%. For installation in the residential sector, an error of 2.0% is optimal;
- Connection method can be direct or by means of transformers. Direct connection metering devices are used at loads up to 100A. If the level of the total load exceeds this indicator, then the connection is made only through transformers.
- Voltage class determined by the way food is received. Measuring voltage transformer is used if necessary to take into account the electricity on the high side of the high-voltage line 6-10kV.
In accordance with the number of tariffs, all electricity meters produced by manufacturers can be single-tariff, two-tariff and multi-tariff.
Two-tariff meters allow you to pay for electricity consumption at day and night rates. It should be noted that the payback time of such a device often exceeds five years.
Safety
 When installing any metering devices yourself, all safety rules must be observed.
Installation, dismantling, replacement and standard verification of electric meters under voltage on current-carrying elements require special attention.
Only specialists carry out work, both in the absence and in the presence of current-carrying parts with a voltage of over 1000V.
The presence of current-carrying parts with voltages above 1000V involves the use of special mesh barriers that completely cover the cells or chambers.
In the presence of relay protection cabinets, brought out of the mesh fence, all work is carried out only by authorized professional electrical engineers.
Tools and materials

Self-replacement or installation of a new electric meter will require the use of special tools:
- comfortable pliers with rubberized handles;
- a set of non-conductive screwdrivers;
- sharp knife for stripping insulation from wires;
- insulating materials;
- measuring multimeter.
Types of electricity meters may differ in fixing methods, so it is necessary to purchase not only wires with a certain cross section, insulators and RCDs with circuit breakers, but also fasteners and a current transformer. Installation is carried out in the subscriber shield using mounting brackets.
 The method of connecting the meter depends on its type. - installation steps.
How to take readings of an electricity meter, depending on the type of device, consider.
You can read tips on choosing an electrical box for a meter. This information will help you make your choice.
Placement rules
The installation of an electric meter in an apartment should be carried out with skill. There are a number of rules that must be observed when installing electrical energy meters on your own:

- installation must be carried out in a place that allows you to easily check or maintain the device;
- when performing installation, the power line must be de-energized in advance;
- the electricity meter is installed at a standard distance from the floor, but the optimal height is 150-170 cm;
- a reliable safety switch must be installed before the electric meter.
Grounding is also mandatory, and after all installation work is completed, a trial or test connection is made.
How to connect an electric meter correctly
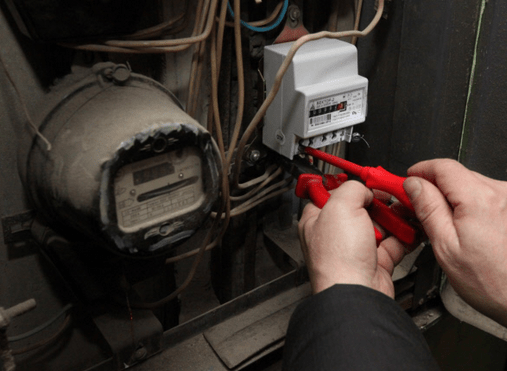
Before connecting, you need to make sure that there is no voltage on the metal panel, as well as record the readings of the electric meter, inspect the appearance and make sure that the seals are intact.
Consider in order how to connect an electricity meter, depending on the model.
Installation of a single-phase device
Independent replacement of electric single-phase meters is carried out in the following sequence:
- inspection of the external state of the electric meter;
- checking the safety of all seals on the meter and on the terminal assembly;
- short-circuit the secondary transformer winding at the current terminals;
- check the absence of current in the electrical circuit of the meter;
- sequential disconnection on the terminal assembly of all conductors of the voltage circuit using insulating caps;
- removal of the clamping cover from the electric meter box;
- checking the absence of voltage on the terminals and loosening the contact screws;
- unscrewing fasteners and dismantling the meter;
- installation of a new metering device and screwing fasteners;
- introduction of voltage and current circuit conductors into the terminals of the electric meter, as well as screw clamping;
- clamping cover installation and sealing.

Wiring diagram for a single-phase electric meter
At the final stage, the insulating caps and short circuiting of the secondary windings on the current transformer are alternately removed.
Connecting three-phase models
When choosing the optimal circuit for connecting three-phase 380V electricity meters, you need to focus on the model of the controlling device. Three-phase models of metering devices also work in standard 220V power networks, and are connected according to the following schemes:
- direct connection option;
- semi-indirect connection option;
- indirect connection.
Devices for direct flow metering of energy consumption are designed to pass current within 100A, which limits their use to a power of 60 kW. Such electric meters are distinguished by terminal contacts for connecting wires with a small cross section.

Wiring diagram of a three-phase meter
The simplest option is a direct or direct connection. In this case, it strips the insulation on the supply conductors and connects to the automatic protective switch, after which three phase conductors are connected to the terminal contacts. The neutral conductor is connected to a pair of the remaining unused contacts.
After the metering device, the installation of three-pole circuit breakers is mandatory.
The final stage
At the final stage of the process of installing the electric meter and connecting the meter, you need to check the correctness of the work performed. It is mandatory to fully check the meter's performance and sealing in order to exclude unauthorized electricity extraction.
Effective approach
 Given the constant increase in electricity tariffs, experts recommend giving preference to the installation of two-tariff metering devices and using all powerful household appliances only at night.
Such modern electric meters allow you to save about 25-30% of money on electricity bills.
 In apartment buildings, residents do not need to worry about installing electricity meters. , on the contrary, falls on the shoulders of the homeowner.
Which box for the counter is better to choose on the street, we will tell.
The cost of installing an electric meter in an apartment
In the absence of sufficient experience and confidence in the ability to correctly perform an independent connection of the meter, it is advisable to involve qualified specialists in such work.
The price for installing electricity meters in an apartment consists of the following list of services:
- the cost of dismantling and installing a single-phase electric meter is about two thousand rubles;
- the cost of dismantling and installing a three-phase electric meter is about four thousand rubles;
- the cost of installing and replacing the current transformer is three thousand rubles;
- the cost of programming the tariff schedule is about a thousand rubles.
The criteria for the accuracy of the readings of an electric meter directly depend on a number of external factors, including humidity parameters, temperature conditions, the chemical composition of the air and the presence of vibrations of various strengths.
Related video
To install an electricity meter in an apartment, knowledge of certain installation technologies is not required; any owner who owns an elementary tool can cope with such a task. In cases of self-installation of devices, violations of the installation order are not allowed. In addition, such actions are associated with the legal component of this event and must be registered at the nearest branch of the official supplier.
 It should always be taken into account that the indicated device, designed to account for the amount of consumed electrical energy, is the permanent property of an organization that provides its services for the energy supply of a certain area of \u200b\u200bhousing space, within which the available power meter is allowed.
The use of electrical equipment is subject to certain rules, the responsibility for compliance with which rests with the user, as well as ensuring the integrity of the safety seals. It is worth paying attention to the fact that the organization exercising control is able to allow the installation of the electric meter by the hands of the consumer only when replacing failed equipment, or when completely replacing the filling of the electrical network, or connecting the object to the power supply.
The amount of payment for the use of electricity in a particular room under its control is directly dependent on the accuracy of the readings of the electric meter. This creates a need:
- Check for idling of the electrical appliance.
- Calculation of the error of the counter.
In apartments, electricity meters are placed in switchboards located on the landing. In order to install an electric meter inside the apartment, it is necessary to have an electrical panel designed for this.
 In the private sector, meters are installed in hallways or in special technical rooms. According to the new rules, an electric meter must be installed in places with free access for unhindered readings from an electrical appliance without the need to penetrate the fences of the site. These requirements are designed to protect the electricity supplier from consumer fraud. Premises exposed to frost are not recommended for do-it-yourself installation of an electric meter in an apartment.
Models of electronic meters are adapted for use both in conditions of single-phase (municipal) networks and three-phase (industrial) networks, depending on the place of their installation. Devices designed for installation in a single-phase network are distinguished by a lower price and simplicity of their design. Among users using electricity for domestic purposes, connections to a three-phase network are very rare.
The main criterion for the difference between electric meters is their principle of operation. The following options are currently available:

 Based on the regulation of 1996, the requirements for the error in the accuracy of readings of electricity meters must comply with the established limit of 2 - 2.5%. Why was GOST installed, which has the number 6570-96, under the terms of which the accuracy requirements for the class of devices approved for use in domestic conditions must be at least 2.
To date, meters have been used that can keep records of both active and reactive load types. In public power networks, to which all apartments, as well as private houses, are connected, it may be possible to install electric meters with your own hands. Here, devices are used to account for the active component of electricity. Therefore, models with these characteristics will be subject to consideration.
If it is necessary to install an electricity meter of a two-tariff model or a three-tariff model at the request of the consumer, it will be necessary to obtain permission from the supplier providing the electricity supply service. In this case, a certain contract will be drawn up, providing the consumer with additional opportunities. Over the past decades, the amount of power consumed in utility networks has increased significantly. This fact forces suppliers to create all kinds of conditions for the transfer of the population to two-tariff meters, which allow more accurate calculations.
 Installing a two-rate meter makes sense only if the consumer uses the maximum limits of their capacities during peak hours, when the network is already overloaded. The two-zone counter has a significant drawback. It is a rather expensive device, in addition, programming of this device is also a paid service.
The main area of application of three-tariff meter models is in the industrial area, however, the laws currently available allow the use of this technique in domestic conditions.
The next criterion that allows classifying electricity meters is the voltage and rated current. The connection of devices that are necessary for operation, in conditions of exceeding the readings of the rated current of the mark of 100 amperes, is carried out using indirect connection using a current transformer. Such devices are used in three-phase networks, which include consumers with high power. Only qualified personnel are authorized to install these devices.
When choosing an electric meter model in case it will be installed independently, it is necessary to fix the time at which the seal was installed on the device case. According to the established rules, the installation time of the seal located on the instrument case should not exceed 1 year.
Device connection
Before you start connecting the meter to your electrical network, you need to prepare the place in which it will be installed. In addition, all the necessary tools, as well as materials, with which the device will be installed, must be prepared in advance.
 In modern stores that provide an assortment of electrical goods, you can choose an electrical panel suitable for installing an electric meter. Here you can find both fully equipped fixtures and any elements for their configuration. In such a store, you can purchase a meter equipped with an installation panel, which will greatly simplify its installation.
When installing the electric meter on the wall, it is necessary to fix its vertical position. The device must be installed in an electrical panel specially designed for this purpose or on an installation panel, which should be purchased in advance from an electrical goods store. There are no special standards that determine the height of the meter, however, there is a provision prohibiting the installation of the device in places inaccessible to direct visual contact. The recommended height of the counter is at around 1 meter 70 centimeters from the floor level.
Before you independently start connecting the electric meter, you need to obtain accurate data on the layout of the electrical wiring in the selected room. The number of installed machines in the electrical panel is determined by the number of formed groups, powerful consumers (washing machine, boiler) are connected directly to the electrical panel to a separate machine.
The procedure for performing work when installing an electric meter on your own:

For comfortable operation of the electrical network, it is necessary to install pointers on the machines that determine the groups connected to each of them.